
The western blot protocol is a crucial laboratory technique used to detect and quantify specific proteins within a complex mixture. We support the viewpoint that understanding this protocol is essential for researchers to obtain reliable results.
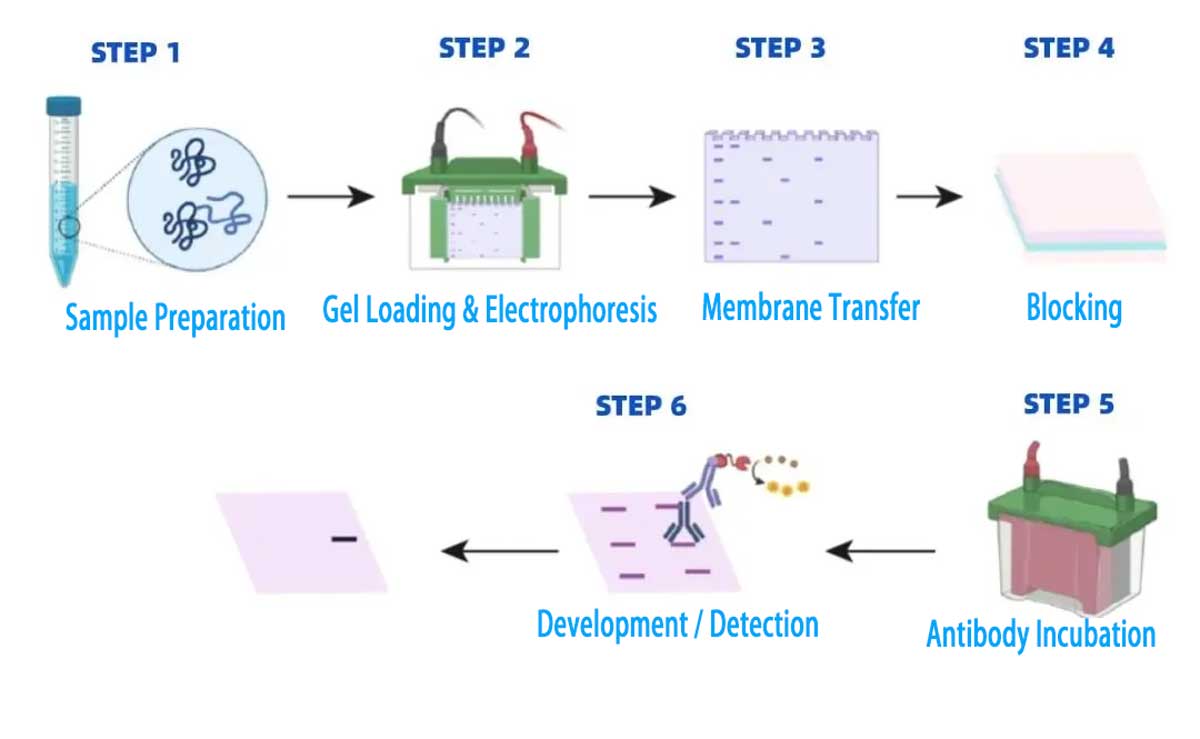
The process involves several key steps, including sample preparation, protein separation, membrane transfer, antibody probing, and detection. Optimizing each step is crucial for achieving accurate and reproducible results. By following a systematic workflow, researchers can identify and quantify proteins of interest, as well as detect post-translational modifications.
As we guide you through the western blot protocol, we will cover the critical aspects of this technique, providing you with the knowledge to improve your research outcomes.
Key Takeaways
- Understanding the western blot protocol is essential for detecting and quantifying specific proteins.
- The technique involves several key steps, from sample preparation to detection.
- Optimizing each step is crucial for achieving accurate and reproducible results.
- A systematic workflow is necessary for reliable protein identification and quantification.
- Post-translational modifications can be detected using the western blot protocol.
Understanding Western Blot: Principles and Applications
The western blot technique has revolutionized the field of protein detection and analysis. It is a powerful tool used to identify and analyze proteins in a sample.
What is Western Blotting?
Western blotting, also known as immunoblotting or protein blotting, is a laboratory technique used to detect and analyze proteins. It involves the separation of proteins based on their size using gel electrophoresis, followed by the transfer of these proteins onto a membrane where they can be probed with antibodies to detect specific target proteins.
The Science Behind the Technique
The western blot technique relies on the specificity of antibodies to bind to their corresponding target proteins. This specificity allows researchers to detect the presence and amount of a particular protein in a sample. The process involves several key steps, including sample preparation, gel electrophoresis, membrane transfer, and detection using antibodies.
Common Applications in Research
Western blotting is widely used in various biological disciplines for protein analysis. Some common applications include studying protein expression levels, validating antibody specificity, and detecting post-translational modifications. Researchers also use western blotting to confirm protein knockdown in gene silencing experiments and to verify protein overexpression in transfection studies.
Additionally, western blotting is valuable in clinical diagnostics for detecting disease biomarkers. For instance, it is used in HIV testing to identify specific viral proteins.
Essential Materials and Equipment
The Western blotting process requires specific reagents and equipment to separate and analyze proteins effectively. We will outline the critical components needed for a successful Western blot analysis.
Reagents and Buffers
To perform a Western blot, you need various reagents and buffers. The SDS (sodium dodecyl sulfate) is a crucial component in the sample buffer, which denatures proteins and provides a negative charge. Additionally, a transfer buffer containing methanol is used to facilitate the transfer of proteins from the gel to the membrane. Other essential solutions include blocking buffers and antibody diluents.
Equipment Checklist
The necessary equipment for Western blotting includes electrophoresis units, power supplies, and transfer apparatus. You will also need a shaking platform for incubation steps and a chemiluminescence detection system for visualizing the results. For more detailed information on Western blotting technology, you can refer to our comprehensive guide on Western Blotting Technology.
Safety Considerations
Several reagents used in Western blotting pose safety hazards. For instance, SDS is an irritant that can damage the eyes, skin, and respiratory system. Methanol in transfer buffers is toxic and flammable, requiring proper ventilation. It is essential to handle these chemicals with gloves, follow proper disposal guidelines, and operate electrical equipment according to manufacturer instructions to avoid shock hazards.
Sample Preparation for Western Blot
Effective sample preparation is the foundation of a successful Western blot, enabling accurate protein analysis. This process involves several critical steps that ensure the quality and reliability of your results.
Cell Lysis Methods
Cell lysis is the initial step in sample preparation, where cells are broken open to release their contents. Various methods can be employed, including mechanical disruption, detergent-based lysis, and enzymatic lysis. The choice of lysis method depends on the cell type and the specific requirements of your experiment. It’s crucial to select a method that effectively releases protein without causing degradation.
Protein Extraction Techniques
After cell lysis, protein extraction techniques are applied to isolate the proteins of interest. This may involve centrifugation to remove cellular debris and the use of specific buffers to solubilize the proteins. The composition of the buffer can significantly affect the extraction efficiency and the stability of the proteins.
Measuring Protein Concentration
Accurate measurement of concentration is vital to ensure that equal amounts of sample are loaded in each lane of the gel. Techniques such as the Bradford assay and BCA assay are commonly used to determine concentration. These methods rely on the colorimetric detection of proteins and require the creation of a standard curve using known concentrations of a standard protein.
By carefully controlling the sample preparation process, you can ensure reliable and reproducible results in your Western blot analysis.
SDS-PAGE: Separating Proteins by Size
SDS-PAGE is a crucial step in Western blotting that enables the separation of proteins based on their size. This technique is fundamental for analyzing protein samples and understanding their composition.
Preparing Polyacrylamide Gels
To start the SDS-PAGE process, you need to prepare polyacrylamide gels. Pouring the gel involves creating a separating gel and a stacking gel. The separating gel is where proteins are separated based on size, while the stacking gel helps to concentrate the samples before they enter the separating gel. We recommend following a standard protocol for gel preparation to ensure consistency.
Sample Loading and Running Conditions
Once the gel is prepared, it’s time to load your samples. You should load a molecular weight marker alongside your samples to provide a reference for protein size. The gel is then run in a buffer tank filled with running buffer. We typically run the gel at a low voltage (60 V) for the stacking gel and increase to a higher voltage (140 V) for the separating gel. The total running time is usually around an hour, or until the dye front reaches the bottom of the gel.
| Step | Voltage | Time |
|---|---|---|
| Stacking Gel | 60 V | Until samples stack |
| Separating Gel | 140 V | Approximately 1 hour |
Monitoring Gel Electrophoresis Progress
Monitoring the progress of gel electrophoresis is crucial. The bromophenol blue dye in the sample buffer acts as a tracking dye, indicating how far the proteins have migrated. We typically stop the electrophoresis when the dye front reaches the bottom of the gel, which usually takes between 60 to 90 minutes, depending on the voltage and gel percentage. Bubbles rising from the electrodes indicate that the current is flowing properly.
By carefully controlling the running conditions and monitoring the gel electrophoresis progress, you can achieve optimal separation of your protein samples.
Western Blot Protocol: Membrane Transfer
After separating proteins by size using SDS-PAGE, the next critical step is transferring them onto a membrane. This process, known as membrane transfer, is essential for detecting specific proteins using antibodies.
Wet Transfer Method
The wet transfer method involves submerging the gel and membrane in a transfer buffer within a tank. We use a transfer buffer that typically contains methanol, glycine, and Tris-base. The presence of methanol helps to fix the proteins onto the membrane, while glycine and Tris-base facilitate the transfer. The tank is then connected to a power supply, and a current is applied to drive the proteins out of the gel and onto the membrane. This method is highly effective for transferring a wide range of protein sizes.
Semi-Dry Transfer Method
In contrast, the semi-dry transfer method uses a significantly smaller amount of transfer buffer, which is absorbed by filter papers placed on either side of the gel-membrane sandwich. This setup is then placed between two electrodes, and a current is applied. The semi-dry method is faster and more convenient than the wet transfer method, requiring less buffer and equipment. However, it may not be as effective for larger proteins.
Verifying Transfer Efficiency
Verifying the efficiency of the transfer is a crucial quality control step. We can achieve this by staining the membrane with Ponceau S, a reversible dye that temporarily stains proteins, allowing us to visualize the transferred proteins. The membrane is stained for 30 seconds to 1 minute and then washed with 1x TBST to remove excess dye. Alternatively, we can stain the gel after transfer with Coomassie blue to check for proteins that may not have transferred. Pre-stained protein ladders also provide a visual confirmation of the transfer process.
| Transfer Method | Buffer Usage | Transfer Efficiency |
|---|---|---|
| Wet Transfer | High | High for a wide range of protein sizes |
| Semi-Dry Transfer | Low | Effective for smaller proteins, may be less efficient for larger proteins |
By verifying transfer efficiency, we ensure that our Western Blot protocol is successful and that we can accurately detect the proteins of interest.
Blocking the Membrane
Blocking the membrane is a critical step in the Western Blot protocol that ensures the specificity of antibody binding. This step is crucial for reducing background noise and achieving clear, accurate results.
Choosing the Right Blocking Agent
Selecting an appropriate blocking agent is vital. Common blocking agents include 5% skim milk in TBST and 5% bovine serum albumin (BSA). The choice of blocking agent depends on the specific application and the type of antibody being used. For instance, BSA is often preferred for detecting phosphoproteins because milk contains phosphates that can interfere with the detection.
Blocking Procedure
To block the membrane, we typically use 5% skim milk in TBST for 1 hour at room temperature. It’s essential to ensure that the membrane is fully covered by the blocking solution and that it is gently agitated. After blocking, the membrane is incubated with the primary antibody in 5% BSA overnight at 4°C on a shaker. Following incubation, the membrane is washed three times with TBST for 5 minutes each.
Common Blocking Mistakes to Avoid
Several common mistakes can compromise the effectiveness of the blocking step. These include:
- Insufficient blocking time, leading to high background.
- Using expired or contaminated blocking agents.
- Allowing the membrane to dry during or after blocking.
- Using the wrong blocking agent for the specific application.
- Excessive blocking, which can mask epitopes and reduce specific antibody binding.
By avoiding these mistakes, you can significantly improve the quality of your Western Blot results.
Primary Antibody Incubation
Primary antibody incubation is where the specificity of your Western blot is determined. This step involves exposing the membrane to a solution containing antibodies that bind to specific proteins.
Selecting Appropriate Antibodies
Choosing the right primary antibody is critical. You need an antibody that is specific to your protein of interest and compatible with the Western blotting technique. Ensure the antibody is validated for Western blot applications to avoid non-specific binding or failure to detect the target protein.
Optimizing Antibody Dilution
The dilution of the primary antibody is crucial for achieving a strong signal without excessive background noise. Start with the manufacturer’s recommended dilution and adjust as necessary based on your specific conditions. The optimal dilution will provide a clear signal while minimizing non-specific binding.
Incubation Conditions and Timing
Incubate the membrane protein-side up in the primary antibody solution with agitation. You can incubate for 1 hour at room temperature or overnight at 2-8°C. Gentle agitation ensures even distribution of the antibody, and the volume should be sufficient to cover the membrane completely.
Primary antibody incubation can be performed for 1-2 hours at room temperature or overnight (12-16 hours) at 4°C. The latter often provides better signal-to-noise ratios. After incubation, the primary antibody solution can be recovered and reused several times, depending on the antibody’s stability.
Secondary Antibody Application
Secondary antibody application plays a pivotal role in detecting the target protein in Western Blotting. This step follows primary antibody incubation and is crucial for signal detection.
Types of Secondary Antibodies
Secondary antibodies are typically conjugated to enzymes such as horseradish peroxidase (HRP) or to fluorescent dyes. The choice of secondary antibody depends on the detection method you plan to use. For instance, HRP-conjugated secondary antibodies are used with chemiluminescent detection systems.
| Type of Secondary Antibody | Detection Method |
|---|---|
| HRP-Conjugated | Chemiluminescent |
| Fluorescent-Conjugated | Fluorescent |
Proper Washing Techniques
After secondary antibody incubation, thorough washing of the membrane is essential to remove unbound antibodies and minimize background noise. Typically, 5-6 washes of 5-10 minutes each are performed using a wash buffer.
Secondary Antibody Incubation
Secondary antibody incubation is usually performed for 1 hour at room temperature with gentle agitation. The dilution of secondary antibodies is typically higher than that of primary antibodies, ranging from 1:2,000 to 1:20,000. For HRP-conjugated secondary antibodies, the dilution should be optimized based on the sensitivity of the ECL substrate.
Detection Methods for Western Blot
Once the proteins are transferred to the membrane, the next critical step is detection, which can be achieved through various techniques. The choice of detection method depends on the sensitivity required, the equipment available, and the specific antibodies used.
Chemiluminescent Detection
Chemiluminescent detection is a widely used method for Western blotting due to its high sensitivity. This technique involves the use of an enzyme-linked antibody that catalyzes a chemiluminescent reaction, producing a light signal that is proportional to the amount of protein present. The signal is then captured on X-ray film or using a digital imaging system. Proper exposure times are crucial to avoid saturation and ensure accurate quantification.
When using chemiluminescent detection, it’s essential to optimize the exposure time to capture the full range of signal intensities without overexposing the blot. Multiple exposures (short, medium, and long) are recommended to achieve the best results.
Fluorescent Detection Systems
Fluorescent detection systems offer another sensitive approach to detecting proteins on Western blots. This method involves labeling antibodies with fluorescent dyes, which emit light at specific wavelengths when excited. Fluorescent detection allows for multiplexing, where multiple proteins can be detected simultaneously on the same blot using different fluorescent labels.
Imaging and Documentation
Proper imaging and documentation are essential for obtaining reliable, reproducible Western blot results. Whether using traditional X-ray film or digital imaging systems, it’s crucial to align the developed film or image with the blot and mark the molecular weight ladder bands directly. Comprehensive documentation should include experimental details such as sample information, antibody dilutions, exposure times, and molecular weight markers.
| Detection Method | Sensitivity | Advantages | Disadvantages |
|---|---|---|---|
| Chemiluminescent | High | High sensitivity, easy to perform | Requires optimization of exposure time |
| Fluorescent | High | Allows multiplexing, quantitative | Requires specialized equipment |
Troubleshooting Common Western Blot Problems
Despite careful planning, Western blots can sometimes yield unexpected results, requiring troubleshooting. You may encounter issues such as no bands or weak signal, high background or non-specific binding, and uneven or distorted bands.
No Bands or Weak Signal
If you are experiencing no bands or a weak signal, it could be due to issues with your sample preparation or antibody selection. Ensure that your sample is fresh and has been kept on ice to prevent protease degradation. You can also try reheating the sample to break the quaternary protein structure if the protein seems to be in too high of a position.
High Background or Non-specific Binding
High background or non-specific binding can be caused by inadequate blocking or improper washing techniques. Verify that you are using the correct blocking agent and follow the recommended blocking procedure. Additionally, optimize your washing steps to minimize non-specific binding.
Uneven or Distorted Bands
Uneven or distorted bands can result from issues during sample preparation, gel electrophoresis, or transfer steps. Check for air bubbles trapped between the gel and membrane during transfer, and ensure that your sample is properly denatured. You can also try reducing the voltage during electrophoresis or transfer to prevent heat distortion.
| Issue | Possible Cause | Solution |
|---|---|---|
| No Bands or Weak Signal | Protease degradation, incorrect antibody | Use fresh sample, alter antibody |
| High Background or Non-specific Binding | Inadequate blocking, improper washing | Optimize blocking and washing steps |
| Uneven or Distorted Bands | Air bubbles, improper denaturation, high voltage | Check transfer sandwich, denature sample properly, reduce voltage |
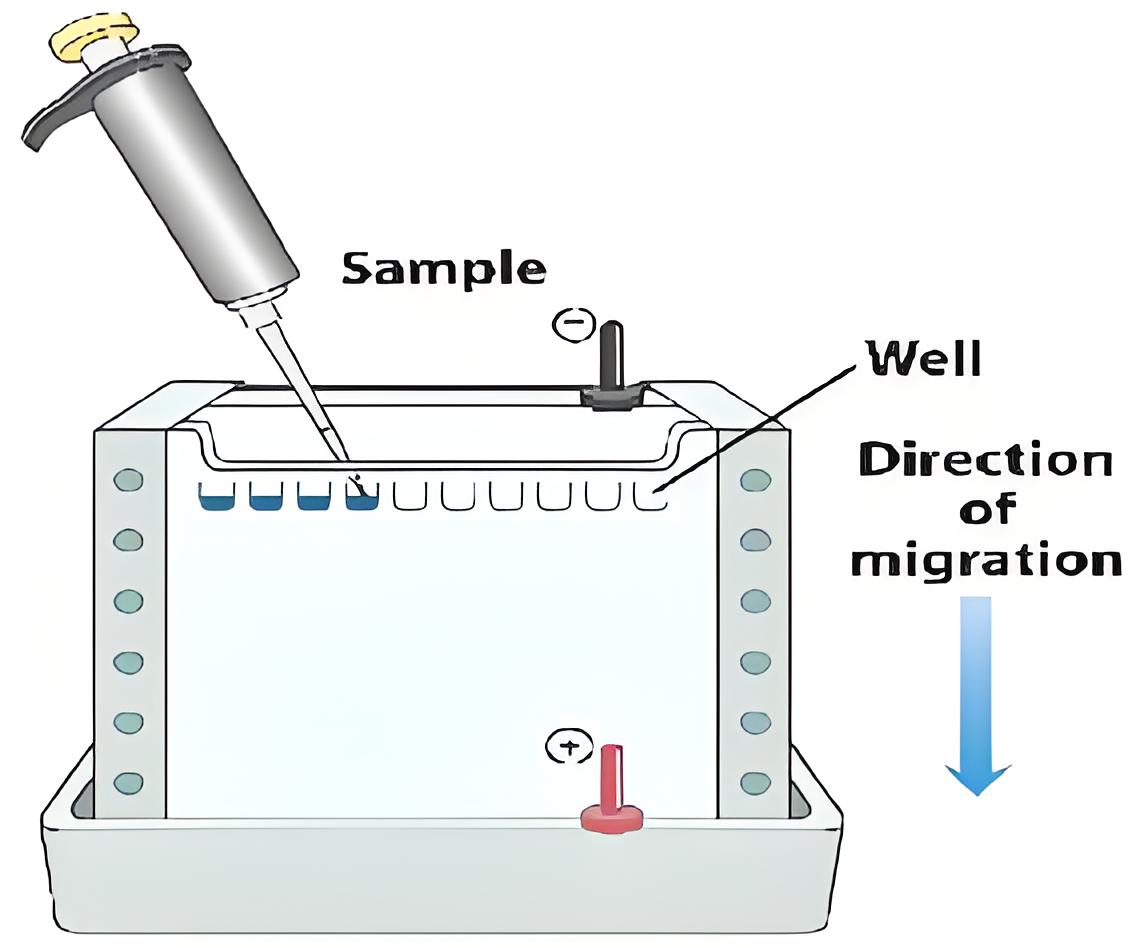
Electrophoresis Diagram
Conclusion
In conclusion, Western blotting remains a cornerstone technique in molecular biology research, offering a powerful means of analyzing proteins. The success of a Western blot protocol depends on careful optimization of each step, from sample preparation to detection. As we have outlined in this guide, attention to detail is crucial for achieving reliable results.
The Western blot technique has remained consistent over the decades, but technological advancements continue to enhance its sensitivity and quantification capabilities. Troubleshooting is an integral part of mastering Western blotting, and experience helps researchers identify and resolve common issues efficiently. To achieve reproducible and publication-quality results, maintaining detailed records of protocols, antibody information, and experimental conditions is essential.
By following the protocol steps outlined in this guide, researchers can achieve reliable Western blot results that advance their scientific investigations. The versatility and relative simplicity of Western blotting make it a valued technique for providing information about both protein size and abundance. As alternative protein detection methods emerge, Western blotting continues to be a vital tool in biochemistry and molecular biology research.
References and further readings:
1.Sule, R., Rivera, G., & Gomes, A. V. (2023). Western blotting (immunoblotting): history, theory, uses, protocol and problems. BioTechniques.
https://www.tandfonline.com/doi/full/10.2144/btn-2022-00342.Hnasko, T. S., & Hnasko, R. M. (2015). The Western Blot. In ELISA: Methods and Protocols (pp. 87–96). Springer.
https://link.springer.com/protocol/10.1007/978-1-4939-2742-5_93.Mahmood, T., & Yang, P. C. (2012). Western blot: technique, theory, and trouble shooting. North American Journal of Medical Sciences, 4(9), 429–434.
FAQ
What type of membrane is recommended for protein transfer in Western blotting?
We recommend using a PVDF membrane, which is known for its durability and protein-binding capabilities. To activate the PVDF membrane, soak it in methanol for a few seconds before equilibration in transfer buffer.
How do I optimize the concentration of my primary antibody for Western blotting?
To optimize primary antibody concentration, start with the manufacturer’s recommended dilution. You can then adjust the concentration based on the signal-to-noise ratio. Typically, a good starting point is between 0.1-1 μg/mL.
What are the common issues that lead to high background in Western blotting?
High background is often caused by inadequate blocking, insufficient washing, or overexposure during detection. Ensure that you use an appropriate blocking agent and follow the recommended washing protocol to minimize non-specific binding.
How can I verify the efficiency of protein transfer during Western blotting?
To verify transfer efficiency, you can stain the membrane with Ponceau S or Coomassie blue after transfer. Alternatively, you can check the gel after transfer to ensure that most of the proteins have been transferred.
What are the key considerations when selecting a secondary antibody for Western blotting?
When selecting a secondary antibody, ensure that it is specific to the host species of your primary antibody and is conjugated to the appropriate detection enzyme or fluorophore. Also, consider the recommended dilution and ensure compatibility with your detection method.
How do I minimize non-specific binding during the Western blotting process?
To minimize non-specific binding, use an appropriate blocking agent, optimize antibody concentrations, and follow a rigorous washing protocol. Additionally, ensure that your buffers and reagents are of high quality and properly prepared.
What is the recommended incubation time for primary and secondary antibodies?
The incubation time can vary depending on the specific antibody and experimental conditions. Typically, primary antibody incubation ranges from 1-2 hours at room temperature or overnight at 4°C. Secondary antibody incubation is usually 1 hour at room temperature.
Leo Bios
Hello, I’m Leo Bios. As an assistant lecturer, I teach cellular and
molecular biology to undergraduates at a regional US Midwest university. I started as a research tech in
a biotech startup over a decade ago, working on molecular diagnostic tools. This practical experience
fuels my teaching and writing, keeping me engaged in biology’s evolution.

Leave a Comment
Your email address will not be published. Required fields are marked *